TH-cam
US
Drawer slides are expensive. Do this instead.
29:32
How to Make a Wooden Tool Chest - Free Plans!
15:06
Making a Storage Cabinet for a Metalworking Workbench/Welding Table
20:47
MARK 마크 '프락치 (Fraktsiya) (Feat. 이영지)' MV
03:20
Real Vs Mannequin Challenge😱
00:32
มายคราฟแต่ "น้ำกับลาวา" สลับกัน!?
00:56
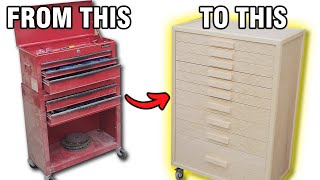
Tool Storage - DIY
KevBotWorkshop
ติดตาม
15K
ดาวน์โหลด
โหลดลิงค์.....
มุมมอง 450 930
0
0
เพิ่มลงใน
เพลย์ลิสต์ของฉัน
ดูภายหลัง
แชร์
แชร์
ฝัง
ขนาดวิดีโอ:
1280 X 720
853 X 480
640 X 360
แสดงแผงควบคุมโปรแกรมเล่น
เล่นอัตโนมัติ
เล่นใหม่
เผยแพร่เมื่อ 18 ม.ค. 2025
ความคิดเห็น • 311
ต่อไป
เล่นอัตโนมัติ
29:32
Drawer slides are expensive. Do this instead.
wittworks
มุมมอง 2.1M
15:06
How to Make a Wooden Tool Chest - Free Plans!
DIY Builds
มุมมอง 494K
20:47
Making a Storage Cabinet for a Metalworking Workbench/Welding Table
Pask Makes
มุมมอง 743K
03:20
MARK 마크 '프락치 (Fraktsiya) (Feat. 이영지)' MV
SMTOWN
มุมมอง 1.6M
00:32
Real Vs Mannequin Challenge😱
Zhong
มุมมอง 17M
00:56
มายคราฟแต่ "น้ำกับลาวา" สลับกัน!?
Zalmonz
มุมมอง 565K
12:31
ไทยพลิกแซงสิงคโปร์ 2-4! อาเซียนยกเป็นแมตช์สุดมันส์!! เหงียนชมดูไทยเล่นสนุกจริง!
หมีเก็บบอล
มุมมอง 51K
14:21
Small Tool Chest Build Equals BIG TIME Workshop Storage | Woodworking
Craftswright
มุมมอง 240K
23:33
Building The Ultimate assortment Cabinet! - 3D Printed assortment boxes!
Alexandre Chappel
มุมมอง 2.1M
33:56
Adam Savage's One Day Builds: Flat File Tool Storage Cabinet!
Adam Savage’s Tested
มุมมอง 333K
15:18
Making The Coolest Toolbox Ever - Woodworking
John Heisz - I Build It
มุมมอง 1.1M
20:04
I don't get why people think drawers are hard
MWA Woodworks
มุมมอง 919K
19:54
When an Engineer Builds a Nightstand
Fix This Build That
มุมมอง 4.2M
17:58
Huge DIY Toolbox! For Cheap!
Petrol360
มุมมอง 479K
13:44
How to Make Useful Steel Boxes - Simple Jig with No Folding Equipment Needed
Pask Makes
มุมมอง 1.7M
10:18
Ultimate French Cleat Tool Wall
Ben Tardif
มุมมอง 2.3M
00:13
Uyurken Kendimi Kurtçukların Arasında Buldum🤯😬🪱
Giggle Jiggle Turkish
มุมมอง 2.4M
00:21
Bloxfruits player after Dragon update🐲| Doge Gaming
Doge Gaming
มุมมอง 1.3M
12:31
ไทยพลิกแซงสิงคโปร์ 2-4! อาเซียนยกเป็นแมตช์สุดมันส์!! เหงียนชมดูไทยเล่นสนุกจริง!
หมีเก็บบอล
มุมมอง 51K
2:13:31
🔴LIVE โหนกระแส ศึกชิงมรดก 500 ล้าน ทายาทฟ้องเด็กรับใช้ปลอมลายเซ็น
โหนกระแส [Hone-Krasae] official
มุมมอง 960K
2:40:50
LIVE🔴 : Cambodia vs Timor-Leste | ASEAN Championship 2024 | 17.12.24
BG SPORTS
มุมมอง 438K
2:00:01
ผู้หญิงแต่งงานกับขอทาน แต่กลับถูกดูหมิ่น ในที่สุดชายขเทานก็เผยตัวตย#ละครหวานๆ#ชอบ
Chaiyo sweet TV
มุมมอง 304K
2:03:50
ศึกมวยไทยพันธมิตร 16/12/2024
True4U
มุมมอง 71K
00:11
Cat mode activated 🤣
Kotiki_Z
มุมมอง 2.1M