iPhone 7 Plus Teardown and Reassemble Guide - Fixez.com

แชร์
ฝัง
  • เผยแพร่เมื่อ 4 ต.ค. 2024
  • Get a high-quality iPhone 7 Plus LCD & Screen:
    Black: bit.ly/2Dy6h1N
    White: bit.ly/2DQxv19
    Grab an affordable iPhone 7 Plus Battery: bit.ly/2mW6YIv
    New iPhone 7 Plus Parts: bit.ly/2mXwCN8
    www.fixez.com presents the official iPhone 7 Plus Screen Replacement, Teardown and Reassemble Guide. This step-by-step repair video will show you how to repair a broken or damaged iPhone 7 Plus 5.5" display assembly, and also how to completely teardown and reassemble your Apple phone. Visit Fixez.com for all of the DIY iPhone 7 Plus replacement screens, parts and tools you need to quickly, and affordably, fix your device!
    Subscribe to our TH-cam Channel for additional DIY smartphone and tablet teardown and repair videos! / @fixez
    Like us on Facebook: / fixez.com
    Follow us on Twitter: / fixezdotcom
    iPhone 7 Plus Screen Repair, Teardown and Reassemble Guide Video:
    Step 1 - Power down your Apple iPhone 7 Plus phone.
    Step 2 - Eject the Nano-SIM Card Tray.
    Step 3 - Remove the two bottom 3.4 mm Pentalobe screws located next to the lightning connector.
    Step 4 - Use the precision knife to create enough space to insert a triangle opening tool. With the opening tool slice through the intense adhesive and help carefully decouple the iPhone 7 Plus display assembly from the rear case. Unlike previous iPhone models the 7 Plus bizarrely opens to the side. The display assembly is still connected to the iPhone by cables along the middle-right side, so don’t try to remove it entirely just yet. Remove the following 4 Tri-Point screws securing the bracket that covers the battery connector and two of the display cables. These screws are different sizes, so be sure to remember where they go. With the bracket out of the way spudge up the cables from the logic board. Remove the following 3 Tri-Point screws that secure the bracket covering the upper component display cable. Disconnect the cable and free the iPhone 7 Plus display assembly from the phone.
    Step 5 - Remove the following 5 Phillips screws, followed by the metal clip they secure in place. Easily extract the stereo-enabling speaker. Use the tweezers to help remove the tangled up iPhone 7 Plus Front-Facing Camera Cable Assembly. It includes the front-facing camera, microphone, proximity sensor and ambient light sensor.
    Step 6 - Remove the following 4 Tri-Point screws and then the metal bracket. Separating the solid state iPhone 7 Plus home button is simple, with only light adhesive on the cable and no delicate gasket.
    Step 7 - Remove the following Phillips screw, and then the 5 Tri-Point screws. With no adhesive on the iPhone 7 Plus LCD shield plate, and the cables nicely managed, simply lift it away from the display assembly.
    Step 8 - In place of the headphone jack is a barometric vent. Remove the following 2 Phillips screws and then raise it out of the iPhone 7 Plus rear case. Remove the following 3 Phillips screws. Detach and free the iPhone 7 Plus Taptic Engine. This sleek engine uses haptic feedback to simulate the push of a button.
    Step 9 - Locate the three peel-to-remove adhesive tabs at the bottom of the 7 Plus battery. Grab the first tab and try to keep the adhesive strip flat and wide. Slowly and gently pull each strip up and away from the iPhone 7 Plus. The strips will stretch to many times the length of the battery- keep pulling until they come out from between the battery and the rear case. Pop the 2900 milliampere-hour (mAh) iPhone 7 Plus battery.
    Step 10 - Remove the following Phillips screw and standoff screw. Remove the protective metal cover. Use the spudger to disconnect the two 12 MP iPhone 7 Plus rear-facing cameras and pry them out of the chassis. One camera is wide-angle with optical image stabilization, the second allows for optical zoom.
    Step 11 - Before digging the iPhone 7 Plus logic board out of the rear case, it is necessary to attack a bevy of Phillips and standoff screws, dispatch of a few connectors, and remove portions of the antenna assembly. After taking care of the last three connectors, carefully uproot the iPhone 7 Plus logic board out of the rear case.
    Step 12 - Remove the following 4 Phillips screws and eradicate the iPhone 7 Plus loudspeaker.
    Step 13 - Remove the following 7 Phillips screws. Use the tweezers to separate the microphones from the speaker grilles. The iPhone 7 plus Lightning connector assembly is moderately adhered to the rear case, but with a little spudgering it is readily removed.
    Step 14 - Remove the following 6 Phillips screws. The last component to surrender is a cable array that contains the power and volume button switches, quad-LED flash, a microphone, and the ring/silent switch.

ความคิดเห็น • 33

  • @Fixez
    @Fixez  6 ปีที่แล้ว +7

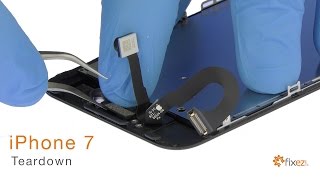
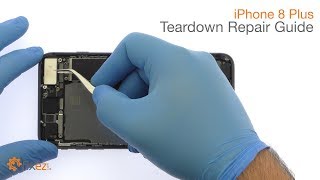
    This easy to follow, step by step video will show you how to safely disassemble and reassemble your iPhone 7 Plus so you can repair your phone all by yourself!

  • @JustinTheVlogger
    @JustinTheVlogger 2 ปีที่แล้ว +2

    Because you have this video, you have a new subscriber. I badly needed it for 1 week from now I will open my phone. Thank you! ❤️🇵🇭

  • @sudilos1172
    @sudilos1172 3 ปีที่แล้ว +3

    27:10 that last screw image is what I needed! Thanks like a boss 👍

  • @kalimatayyeba7746
    @kalimatayyeba7746 7 ปีที่แล้ว +3

    A lot of screws. But it is good for stability. Amazing

  • @biebersakeeper
    @biebersakeeper 7 ปีที่แล้ว +8

    This video is really helpful, but it would've been PERFECT if you had shown which screws go where. Im keeping track, but its easy to forget quick. Thanks!

  • @SecularSerenity
    @SecularSerenity 8 ปีที่แล้ว +19

    RIP to the people who need to replace their screen already.

    • @linhvu4494
      @linhvu4494 7 ปีที่แล้ว

      Austin Archer I

  • @jpnicolas645
    @jpnicolas645 7 ปีที่แล้ว +2

    i just brought here from the guy who made own iphone 6s so cool 😍 i will build my own iPhone 7 plus

    • @pette
      @pette 7 ปีที่แล้ว +3

      Easy to say but try to find the motherboard at a good price haha

  • @cuentasnetflix8351
    @cuentasnetflix8351 4 ปีที่แล้ว +2

    Great video. A lot of detail 👍🏼

  • @Wonderfulvalleys72
    @Wonderfulvalleys72 6 หลายเดือนก่อน +1

    great

  • @hanzlaali5865
    @hanzlaali5865 4 ปีที่แล้ว +1

    excellent 👍

  • @matooo95
    @matooo95 8 ปีที่แล้ว +3

    Why not 1080p/4k?

    • @pette
      @pette 7 ปีที่แล้ว

      I know right!!

  • @ahmadsaleh83
    @ahmadsaleh83 8 ปีที่แล้ว +1

    super.

  • @maidenjump
    @maidenjump 8 ปีที่แล้ว +1

    hi, after assembly of all parts, will the device still retain its water resistance?

    • @Fixez
      @Fixez  8 ปีที่แล้ว +1

      +maidenjump After opening this device it will no longer be water resistant.

    • @nhocbuidoi4095
      @nhocbuidoi4095 7 ปีที่แล้ว

      I will just gеt mу iРРhоnе 7 herееее twitter.com/e835ba75622072018/status/790428760050798592 for frее :) iРhonее 7 Рlus Теardоооwn аnd Rеааaаssеmblе Guidе Fiхez сооооm

  • @invalidusername100
    @invalidusername100 8 ปีที่แล้ว

    Thanks

  • @77Assassin7
    @77Assassin7 8 ปีที่แล้ว

    Excellent

  • @alihamzaofficial4691
    @alihamzaofficial4691 3 ปีที่แล้ว +1

    good 👌🏼 thanks

  • @李明相-d6q
    @李明相-d6q 7 ปีที่แล้ว +2

    畫面清楚。

  • @sebi9225
    @sebi9225 7 ปีที่แล้ว +3

    Say goodbye to the water resistance after disassembling. It goes away if you open up your iPhone 7

    • @HenryTheBoilermaker3rdYear
      @HenryTheBoilermaker3rdYear 7 ปีที่แล้ว +2

      Who cares I don't care about the water resistance

    • @NorFam
      @NorFam ปีที่แล้ว

      Hey are you well? I'll answer your question

    • @NorFam
      @NorFam ปีที่แล้ว

      When you begin to open the phone, you're removing the Iphones adhesive, that adhesive creates mose of the resistance. I'm not sure if I phones gadgets within the phone are water resistant, I wouldn't try it.

    • @SimSpeed1
      @SimSpeed1 3 วันที่ผ่านมา

      @@HenryTheBoilermaker3rdYear true, but you can but the adhesive agin for a couple bucks

  • @frankjamesbonarrigo7162
    @frankjamesbonarrigo7162 8 ปีที่แล้ว +4

    so easy to tear those flimsy cables. this shit is not easy to do. youd have to practice on 50 phones before you get good. get a warranty

    • @jasmine-so3fd
      @jasmine-so3fd 6 ปีที่แล้ว +3

      i got good on the first try so yea no u dont

  • @devincarbone5003
    @devincarbone5003 8 ปีที่แล้ว

    am I first?! lol