Air Lift Load Lifter 5000 Air Bag Install Ford Super Duty

ฝัง
- เผยแพร่เมื่อ 3 ธ.ค. 2024
- Straight forward and very detailed video on how to install Air Lift Load Lifter 5000 series airbags on a Ford F250 Super Duty. This video covers airlift kit # 57399, # 88399, and # 89399 2017-current Ford F250 and F350 single and dual rear wheel systems.
#superduty
#liftedtrucks
#airbags
This was purchased on Amazon. Here is the link www.amazon.com...


![เป็นไปได้ไหม - WanMai [Teaser] | 05-12-24](http://i.ytimg.com/vi/P5Uto6e453w/mqdefault.jpg)


Perfect video for the garage shop kind. Nice to see an install without having a 250k shop and endless tools.
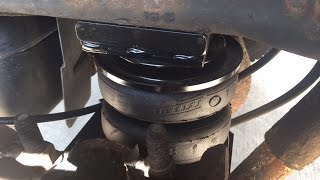
The heat shield is suppose to be left flat and not bent around the exhaust, you use the big hose clamps to hold the shield center tabs to the exhaust not the whole shield to the exhaust, the center tabs on the shield should be only clamped to the exhaust, the way you did it by bending the shield around the exhaust is just going to heat the shield up as much as the exhaust and not do anything to block heat to the airbag, if it is installed correctly, it gives enough air space between the shield and exhaust to actually create a gap between the two which blocks the heat from the airbag. Good job on the reast of the installation, that was the only thing I saw that was done incorrectly was the shield installation.
A little late to the video but just seeing how the heat shield gave me anxiety. Overall good video and I dont even own a Ford haha.
Man I can't thank you enough for this video!!!! I'm sorry for the rude people who have no tact in their delivery. I appreciate the time you put into making this with great detail! God bless!
I just finished this install on my F250 about an hour ago. Your video was awesome. It made my install so much easier. Your step by step instructions were spot on!! Thank you for doing this video. You da’ man!!
Just installed mine this week on a 2022 F350, along with 4 Bilstein shocks and a B&W gooseneck hitch. I spent a few more minutes and removed the rear tires and the spare, and it was worth the effort for the easy access. Great video!
Thanks bro. I’m going to try on my 250. Box of 5000 bags been sitting in garage for 2 months. Got the confidence now.
man that was one hell of a video. i watched several videos on how to install this airbag system and yours helped me more than all the others combined. thank you
you just picked up another subscriber
You make it look real easy. I've been thinking of getting it done on my f250. Now I'll do it myself.
21 F350 owner , Great Video very detailed !
Husband can't wait to get his installed. He's got a F-350 dually 2016 to do the installation on. He's checked at some of our garages here and they want $650.00 + to do it. No way. Thanks for the video.
Thank you I appreciate the support. If you run into issues just let me know.
You made it look really easy. Been wanting to put a set of those air bags on my 250. I was going to have them installed but after watching your video I think I will save that install money and do it myself.
You should have no problem doing it yourself if you follow my video. Just let me know if you have any questions. Thanks for the positive feedback!
Great video. I removed the bottom bolt on my shocks and swing it away so I could get the airbag in place. 66lbs is the torque when reinstalling the shock.
Thanks for the tip.
Great video! Very well thought out and delivered to your audience! Extremely helpful to me!!
Thank you. I appreciate your helpful video. I know it takes time and patience to do these. Thanks again any many Blessings to you and your Family. Joseph W.
Great job. Looking at putting them on my 2023 F250. Thanks Sub.
Excellent install video!
Nice work. You are good at explaining the install. The kit looks to be quality.
The heat shield was installed incorrectly. The tabs need to be bent so there will be a 1/2in air gap between the exhaust and the shield itself.
I was cringing when the heat shield was being installed. Hopefully it gets fixed. Easy enough to do.
Great Video and thanks for providing it. I am now more willing to try this myself and will likely add it to my F350 to pull my toy hauler. I thought something was wrong with the heat shield and went to the Amazon link where I watched their video (not as good as this one) and saw how the heat shield was to be installed. Please see the video at the link above and scroll to -40 seconds left in video to see the heat shield preferred install. Again great video @BlueCollarGarage
Thank you i feel comfortable doing this job
Yeah man I love my airlift 7500xl also did the wirelessone manifold and compressor installed it on my f450. Great vid.
About shit myself when I saw your Wyoming plates. I'm up here in Gillette. Good video. I need air bags for my 2016 F250. She's only got the 2/1 leaf package and squats pretty good with little to no tongue weight.
Thank you for a great presentation. You answered some of my questions.
Great video! Thanks!
Great Video also subscribed putting the same air bags on my 2022 f250 4wd crewcab Godzilla,I recently installed a gooseneck hitch from a 2019 f250 keep up good videos 👍👍👍
Your video was SUPER helpful, so thank you for doing it. My total installation time with the air bags and the air compressor was only 7 hours because of your help.
I see where someone already mentioned the heat shield, and I am guessing that someone has also already pointed out that you forgot to show the install of the curved seat bracket that goes on the bottom of the bag mount plate. (Or maybe I just missed it in the video). Either way, I also followed along with the manual so it was no big deal.
what air compressor did you get and why?
@@billb672 I chose the latest version of the Wireless One because it look like a great product and I won't be needing to adjust either side separately. It just made perfect sense for what I was trying to accomplish
Great video right up until you installed the heat shield .
But your video was very helpful great idea of removing the tires .
Great Video!!!
Good day, great step by step video clearly understandable. Im curious if the bags help or make the ride quality more comfortable as well. I have a 2012 f250 with a 6inch lift, Bilstein resorvoir Bilstein shocks. Thanks
I put this on my buddy's truck and haven't really asked him about the ride quality. I installed some on my 05 excursion and it didn't really improve ride quality it makes the ride a lot stiffer depending on how much air I add to them.
colocaste muy mal el escudo termico.. se coloca de las dos pestañas del centro dobladas en forma de L y se doblan las orejas hacia afuera para que disipen el calor al estar separadas del tubo de escape.. por lo demas muy buen trabajo... felicitaciones..
Subbed. Super helpful, thanks! I have a 17 F350, so more videos please...
Thanks for the support got so more videos coming out in the future.
Great job! Thanks
Nice... Can this be done without a jack and jack stands?
No you will need a jack and stands because you will need to drop the axle pretty low with the tires off.
So as everyone stated, GREAT VIDEO. I just installed the bags on my 2020 250SD. I also noticed this in your assembly but you moved right past it. My question is this, when mounting the top of the bag with the 4 carriage bolts to the bracket previously mounted on the frame, it seems like the top of the bag lines up about 1" in front of the bracket that mounts to the frame. My concern is if you pull the bag back and continue the install, as you did, is that causing an unnecessary "torqueing" on the bag? I tried calling Air Lift today but the tech support was closed. Am I overthinking? Thoughts??
The video is great however installation of the exhaust pipe shield is incorrect. You are suppose to clamp just the tab portion after it is bent to bisition an air gap between the shield and exhaust system. Installing the shield directly contacting the hit exhaust will defeat its purpose. Check the installation manual for proper directions. I redid mine after realizing I wasn’t doing it correctly.
Great video, should make my install easier on my 07. Any advice on installing mine with a pre existing b+w hitch? Thanks again.
Thanks for the positive feedback. I don't really have any other advise on installing it with the b+w hitch should be the same process. Good luck with the install.
Can you install the bags directly on the axle? I don’t have that flat part over my axle to mount them on
Putting a T fitting on the lines so you only have one Schrader air valve will allow you to more evenly pressurize the bags I'm thinking.
Yeah I don't know why these kits don't include a tee fitting. I guess it's another way for these companies to make more money selling it separate.
If you have an unbalanced load, the air will be pushed to the lesser loaded bag and cause issues.
You can order a 1/4" tee off Amazon for $10.00 if you're looking to run one Schrader valve for both bags. Not sure why this kit doesn't come with one. I've installed other set ups from Air Lift and they all had a Tee.
Great install video. I think heat shield should be flat but not positive.
Also, can you T off the rear bag or do they need to be individual?
Thanks. You can use the union tee fitting here’s a link to it on Amazon www.amazon.com/dp/B001F532PY/ref=cm_sw_r_as_gl_api_gl_i_HEW1VWGHWZ0169GJ2AK4?linkCode=ml2&tag=bluecollargar-20 that’s what most people use not sure why air lift or Firestone just don’t include it with the kits. Seems like the only reason you would want the individual ones is for if you have an offset load I guess and need more air in one side.
@@BLUECOLLARGARAGE decided not to do a T fitting as I don’t want them to load/unload side to side. I’d rather maintain a Constant Spring rate. Shouldn’t ever T them for towing.
HT semi truck suspension is controlled by a leveling valve from 1 supply line going to all 4 air bags from the leveling valve. A T fitting in the line won’t hurt anything.
@@truckdrivinmilanr you know I’d love to agree but I’d have to test that. I have the tools to do so as well. What will actually help with that theory is a sway bar set up. That would help try to equalize loading left to right. If there were no bar then it would and could simply fall down onto one side as load is produced on one and taken from the other allowing air to freely flow into a cavity that can fill up. Now how freely it flows there depends also on capacity, how much that’s bay can expand and flow rate. Many variables and if any of them are changed it can change the end result.
Great Video....Thx!!!!
im from sheridan wyoming!!!
Does this help ride quality or simply to help the springs?
Simply to help the springs from sagging while hauling heavy loads
Are longer shock absorbers needed?
Nope this system doesn’t effect the shock travel.
ممنون از ویدیو خوبتون
How's the alignment after the level kit?
It was definitely off and had to get the aftermarket camber and caster adjusting sleeves.
Crazy they don't have a T in the kit to tie both air bags together so you don't hand to fill them to separately
Yeah that’s how they get you to spend more money by not including it.
What are. You hauling?
He hauls a 5th wheel toy hauler.
You forgot to add the bottom plate that sits on the block in your bag assembly..
No they are on there you can clearly see them on the passenger side at 14:38 and on the driver side at 18:21
You got the tabs on the heat shield backwards.heat shield should not be touching exhaust pipe only the tabs and clamps should be touching exhaust pipe otherwise the heat shield will get just as hot as the exhaust pipe defeating the purpose of heat shield. Otherwise nice job.
The story of my life, not enough hands and fingerd
I think you installed the heat shield wrong.
I did I’ve been called out on it multiple times it’s been fixed.
Video would have been good but left out the part that sits on the overload block.
If vehicle is sitting on a level surface, then wheel chocks arent needed.
So he never showed in the video putting that little curved bracket on the bottom of the bag plate. He shows tightening its bolt later but never mentioned that bracket to sit on top of the bump stop base. Had to take the whole bag back out last night to add that in. Not cool dude.
Don't follow this video. He missed the lower bracket cup.
Maybe you should watch the entire video before commenting. I did not forget the lower bracket cups you can clearly see it on the passenger side at 14:52 and on the drivers side at 18:21.