
- 15
- 184 377
WildCatDIY
เข้าร่วมเมื่อ 13 มิ.ย. 2022
Welcome to WildCatDIY!
I share how-to DIY home improvement projects, lessons learned and creative hacks on this channel. I learned a lot about home renovations and repairs from my father-in-law and TH-cam so post these videos in hopes of helping others and giving back. May these videos inspire you to take on something new and learn along the way!
You may notice that cats make an appearance in many videos. We share our home with 10 truly wild cats!
-Kayleigh
How to Fix a Intermittently Running Toilet
How to fix a intermittently running toilet, also known as 'ghost flushing' or 'phantom flushing.' This issue can increase your water bill but is usually an easy fix! A toilet that runs periodically is typically the result of an issue with the flapper or fill valve. This video shows how to replace a toilet flapper since doing so stopped our toilet from running sporadically.
Some popular toilet flapper products are linked below (affiliate links)
*As an Amazon Associate I earn a commission from qualifying purchases at no additional cost to you. If you shop through my affiliate links, thank you!
Korky 3" flapper: amzn.to/3zbJJSM
Fluidmaster 3" flapper: amzn.to/4em8ps1
Toto 3" flapper: amzn.to/3VGYUfM
Fluidmaster 2" flapper: amzn.to/4cmTziW
Other ways you can help support the channel:
SUBSCRIBE to WildCatDIY: www.youtube.com/@wildcat-diy?sub_confirmation=1
☕Buy Me A Catffeinated Coffee
www.buymeacoffee.com/wildcatdiy
Clock animation from Patrick Stirling:
stirlingsupply.co/products/just-a-clock
Music provided by Epidemic Sound.
Epidemic Sound referral link: share.epidemicsound.com/augvds
Audio tracks used in this video are below.
The Friendly Ghost by Arthur Benson: www.epidemicsound.com/track/1Gw9op6eul/
Ghost Band Run by Dusty Decks: www.epidemicsound.com/track/aOwS3a68xh/
Ghost of the Hour by Mike Franklyn: www.epidemicsound.com/track/aCvabBgPln/
Follow the Ghost by The Eastern Plain: www.epidemicsound.com/track/BtjI7mb1XC/
Disclaimer:
Videos produced by WildCatDIY are provided for informational, educational and entertainment purposes only. WildCatDIY assumes no responsibility or liability for any loss, damage or injury incurred as a result of any content communicated in this video. Use this information at your own risk. Review instructions carefully before beginning any project and if you have any doubts or questions about how to complete a project, consult with local experts. Use safe practices when performing any Do-It-Yourself (DIY) repairs and when working with tools seen or implied in this video. Always read and follow all safety precautions provided by any tool or equipment manufacturer. Due to factors beyond the control of WildCatDIY, no information contained within this video creates any expressed or implied warranty or guarantee of any particular result. Any injury, property damage, or loss that may result from improper use of tools, equipment or from the information contained in this video is the sole responsibility of the viewer or user and not WildCatDIY.
มุมมอง: 258
วีดีโอ


Fix a Humming Garbage Disposal - 4 Ways!
มุมมอง 5352 หลายเดือนก่อน
How to fix a jammed or clogged garbage disposal that isn't spinning and makes only a humming or a buzzing noise when turned on. This video covers 4 ways to unjam a garbage disposal that is not spinning. The disposal shown in this video is a InSinkErator Badger 5XL. Method 1: Check for Clogs Method 2: Reset Button Method 3: Manually Turn From Underneath Method 4: Manually Turn From Above A varie...

How to Install Cordless Window Shades | awardblinds.com
มุมมอง 683 หลายเดือนก่อน
Replacing window blinds with shades. Step by step of how to measure for and install ¾" cordless cellular TDBU window shades (outside mount) from awardblinds.com Chapters Materials and Tools 0:00 Preparation and Planning 1:10 Install Process 3:02 Savings note: awardblinds.com seems to always have a 45% off all products sale Shipping note: Award Blinds.com, Inc. is a North Carolina based Corporat...

How To Install TDBU Window Shades | awardblinds.com
มุมมอง 1.6K4 หลายเดือนก่อน
Replacing window blinds with shades. Step by step of how to measure for and install ¾" cordless cellular TDBU window shades (inside mount) from awardblinds.com Chapters Materials and Tools 0:00 Preparation and Planning 0:44 Install Process 2:50 Savings note: awardblinds.com seems to always have a 45% off all products sale Shipping note: Award Blinds.com, Inc. is a North Carolina based Corporati...

Replacing an Outdoor Light Fixture + 3 Install Tips
มุมมอง 6726 หลายเดือนก่อน
How-to video on replacing an exterior light fixture with a new wall sconce or porch lantern on vinyl siding. Light box material: metal Chapters 0:00 Intro 1:06 Remove the Old Light Fixture 2:46 Tips to Ease Installation 3:38 Install the New Light Fixture Products and tools used (affiliate links) *As an Amazon Associate I earn a commission from qualifying purchases at no additional cost to you. ...
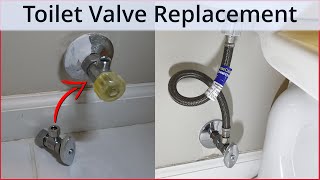
How to Remove and Replace a Leaky Shut Off Valve for a Toilet
มุมมอง 71K9 หลายเดือนก่อน
How to remove and replace a leaky compression shut-off valve (or stop valve) on a copper supply line for a toilet. The most challenging part of this project is removing the compression sleeve or ring but there's a tool that makes this task easier! How to Remove, Install, Replace or Update a Toilet Yourself: th-cam.com/video/2OShL3h8E00/w-d-xo.html Products and tools used (affiliate links) *As a...

How to Install or Replace a Toilet
มุมมอง 1.6K10 หลายเดือนก่อน
How to install and replace a toilet. How to remove and replace a compression shut-off valve (or stop valve) on a copper supply line for a toilet: th-cam.com/video/IWr52sLhQn8/w-d-xo.html Products and tools used (affiliate links) *As an Amazon Associate I earn a commission from qualifying purchases at no additional cost to you. If you shop through my affiliate links, thank you! Adjustable wrench...

Wood Stripping with QCS by Stripwell
มุมมอง 49111 หลายเดือนก่อน
Refinishing a thrifted wood-framed mirror using QCS (Quick, Clean, and Safe) by Stripwell. Promo Code - Wildcat10 for 10% off your QCS order! www.stripwell.com/shop.html#/ Products and tools used (affiliate links) *As an Amazon Associate I earn a commission from qualifying purchases at no additional cost to you. If you shop through my affiliate links, thank you! Steel wool: amzn.to/3s4r4F3 Husk...

DIY Lighting Upgrade: Replace Fluorescent Light Fixtures with LED Light Fixtures
มุมมอง 72Kปีที่แล้ว
How-to video on replacing fluorescent light fixtures with LED flush mount light fixtures and puck lights. Products and tools used (affiliate links) *As an Amazon Associate I earn a commission from qualifying purchases at no additional cost to you. If you shop through my affiliate links, thank you! Generation Lighting Clip Ceiling 12.25 in. W. 2-Light Brushed Nickel Flush Mount: www.homedepot.co...
Aquasana Under-Sink Water Filter Replacement: Easy Step-by-Step Guide
มุมมอง 8Kปีที่แล้ว
Easy DIY how-to video on replacing Aquasana under-sink water filters. I hope this video helps with replacing your water filters! A compressed (short) video covering the filter replacement steps can be viewed here: th-cam.com/users/shortsRJ0dMC7ZxwA Products and tools used (affiliate links) *As an Amazon Associate I earn a commission from qualifying purchases at no additional cost to you. If you...
Hunter Channing Fan Install
มุมมอง 7Kปีที่แล้ว
How-to video on the installation of a new Hunter Channing 52 in. LED Indoor Snow White Ceiling Fan with Light (*and Remote). *Instead of installing the included remote receiver for the handheld remote, we replaced our single-pole light switch with a Lutron Maestro Fan Control and Light Dimmer for Dimmable LEDs, Incandescent, and Halogen Bulbs, Single-Pole, MACL-LFQ-WH, in White. This fan contro...
Thanks. Where is the link to the voltage tester?
Here's a link to the Milwaukee voltage tester on Amazon: amzn.to/3oQRB7F
THANK YOU SO MUCH
Thanks for your professional advice & “to the point” video!!
Where exactly is the ground screw?
The green ground screw on our old fluorescent fixture was near the center of the fixture's metal housing. On the new light fixtures, the ground screw is on the mounting plate or mounting bracket.
❤
Great DYI video. You keep it clear and concise. Video is great too. Thanks for sharing your experience. And the cats are so fun.
I'm so glad ☺ Thank you!
Replaced the battery but didn’t beep. 😢😢😢
I've experienced this too. I assume the battery is bad when there's no beep but wait to change it along with the filters from our subscription. Do you have a way to test the battery?
@@wildcat-diy no I don’t. Sorry. I will wait for the next set to arrive.
That explains why I'm looking at this video. Started using bleach tablets a year ago and now there's steady drops of water going into the bowl. I confirmed this by adding some food coloring to the tank. The color going into the bowl meant I should replace the flapper.
Thanks for sharing this! The food coloring test is a great way to check if the flapper is faulty. Another method is to mark the water level inside the tank with a pencil, turn off the water supply to the tank, and check the level again after 30 minutes. If the water level has dropped below the pencil mark, it's likely that water is leaking past the flapper and into the bowl. I like the visual aspect of the food coloring though ☺ Have you seen Fluidmaster's Flush 'n Sparkle product? I noticed it on their website. It allows for bleach use, without it being in the tank water, by passing bleach water through a tube, down the overflow pipe, and into the bowl.
thank you!❤
You're most welcome!
At first, I wondered why you did a loop with the supply line instead of just getting the correct size. I just replaced my shut off valve and the existing supply line no longer fit, nor did a a new 9-inch braided line bend correctly to align between the tank and the valve. Lucky for me, I remembered your loop maneuver and bought a 20-inch line, looped it, and everything fit like a champ! You saved me a lot of stress on solving this issue. Thank you!
That's awesome ☺I'm so glad this trick was helpful and made the install process easier! Thank you for sharing your project experience ❤
This is exactly what I need to do. Thank you for clear instructions!
I'm so glad! Thank you for your comment ☺
I wish all videos were this clear!!!
Thank you for your kind words ☺
I like this video very much. I learned how to replace my leaking shut off valve. Thanks. 👍
That's awesome! I'm so glad this video was helpful to you ☺
Why would anybody fit a crappy multi turn valve? Those are the valves that stop working just when you need them, and which people are ripping out and replacing with reliable quarter turn valves.
Quarter-turn valves seem to be well liked and reliable. That will be what I use for a future shut-off valve replacement project ☺
Yup, you definitely want some 'bite' with screws. Just make sure you're using the right drill bit for the right material :)
Great callout ❤ This makes all the difference!
don't forget that depending on what material you anchor into (like lumber) you actually want a bit of pressure on the screw shaft, so a slightly smaller bit should be used.
This is a great point! Thank you ❤
Best video hands down !! Thank you
Thank you for your kind words! ☺
Great video. Can you remove the old ferrel washer without the tool ?
Thank you ☺Yes, you can! I've seen a few old ferrule removal methods, such as using a small hacksaw to make a shallow cut on the ferrule and then splitting it apart by putting the tip of a flathead screwdriver into the cut and twisting. Another approach is to use two pliers, with one holding the copper pipe behind the ferrule and using the other plier to wiggle the ferrule back and forth while pulling it towards the end of the pipe. I also found a creative solution on someone's channel (video link below) where they turned an old compression shut-off valve into a puller tool. They placed the end of a large bolt inside the old valve to create space between it and the copper pipe so when the nut was tightened onto the valve threads, the ferrule was pulled towards the end of the pipe. They repeated the process, keeping the extra space between the copper pipe and valve by placing a washer and nut behind the screw head, until the old compression ring could be easily removed with pliers from the end of the pipe. Video Link: th-cam.com/video/COYnuj7sIvo/w-d-xo.htmlsi=heSD-GpqjdJ4mO0z
3 hours??
Hahahahahahahhaahhahahahaha
Good job
Thank you ☺
Thanks for the video. I had to do exactly the same thing at home. This was very helpful. God bless you
That's awesome! I'm so glad to hear that. Thank you for your comment ☺
Who has 10 cats 🤪
☺ We seem to have a knack for being at the right place at the right time to find stray cats.
You could use a deburring tool to make the inside of the copper pipe not sharp. I saw it used in a video on Home Depot video.
Excellent point! Thanks for mentioning this. Deburring tools and tube cleaning brushes help make the pipe cleaning process quicker and safer. Next time I'm working with copper pipe, I'll include them in the process!
Finally a video for my exact problem. Thank you👍 its not as complicated as i thought it would be
☺ I'm so glad to hear that!
I till don't understand why you needed a hammer and a ladder for this.
You don't need a ladder or a hammer for this project. Where did you see or read about them being needed? Were you perhaps referring to another video?
@@wildcat-diy Very funny. And, I needed a laugh today. Thanks, very much. ;)
Nice job, I also noticed that you did not touch the light bulb with your fingers.
Thank you ☺ I try to avoid touching bulbs with my bare hands since the oils from our skin can create hot spots on the bulb, potentially shortening its lifespan. Granted, LED bulbs like the ones used for this fixture aren't as easily affected compared to incandescent or halogen bulbs, but I think it's a good habit to have when working with light bulbs in general.
How the phuk did this take you 3 hours?!?
This is like a 30min job at most. If you have all of your parts within arm's reach, and turned off the water main, this is pretty straightforward. But I think the video is excellent!
That was exactly my question!!! seems like a 10 minute job!
I THOUGHT it was going to be a 10 minute job... until I realized that the tool which removes the old compression fitting didn't fit behind my toilet. So instead I had to use a couple sets of pliers and it took over an hour just to take it off. Millimeter by millimeter... 😭 That fitting was probably about 30 years old.
Wow, kudos for sticking with it for so long to see it through! The compression sleeve I removed had been on for about as long (29 years) and removal was not easy or quick. What took additional time was waiting for all of the water to drain since this shut-off valve is located at the lowest level of our home. Sometimes, there's an outside spigot at a lower level but this wasn't so in our case. I hope most who tackle this project have an easier and quicker time! Regarding the limited space you had to work with, and for others in similar circumstances, I noticed this 3.7" ferrule puller on Amazon which seems to work well for ½" copper pipe: amzn.to/490vrS9
Great video. Here’s a little tip. Replace your gateway style valve with a quarter turn ball valve and never have to do this job again. 😉
I wouldn't be surprised if they typically last longer since there's less movement (and less wear over time) to open and close the valve. Next time I need to replace a toilet shut-off valve, I'll grab a quarter-turn valve for the project. Thank you for the suggestion!
I absolutely loved this video - all steps were clearly outlined, extremely good video quality where every step was visible without any obstructions, great alternatives provided to tools used. I wish every DIY video was like this. Oh and great voice too :-). Thanks so much for taking the time - it helped me to change my filter easily!
That's wonderful! I'm so glad you found this video helpful ☺ Thank you for your kind words. You made my day!
😊
Man voice
Thank you for the video. It was extremely good. Now I ha have a question- do I need. to remove this battery when I don’t use the remote in winter. Motoko
Thank you ☺ It may be a matter of preference but I noticed that some popular battery companies recommend removing batteries from a device when it is not expected to be in use for extended periods of time, to prevent potential issues like battery leakage. This will also preserve battery life.
What size screwdriver are you using because mine will not unscrew? Thx
The small screwdriver I used has a diameter of 1/8" or roughly 3mm so I believe this is a Phillips #1.
If you don't have a screwdriver small enough, see if you have one in a glasses repair kit like they sell in grocery/drug stores. Also, check to see if you have one for a sewing machine--they are usually quite tiny.
Use some thread sealant but thanks for the tutorial. That darn olive.
You must be from England. That's what it is called there, but not in the US.
Why would you use thread sealant on a compression fitting, when the threads have no part in the seal on this type of fitting?
I have replaced the filters several times. After the latest time, no water comes out of the faucet. Water is going in to the elements, but even after waiting several minutes no water comes out of the faucet. I tried removing and reinstalling all the elements, but get the same result.
I've come across a few threads on Reddit and Amazon reviews where people mention this problem (no water flow) due to the pre-filter (first filter sump) being just a little shorter than the others, meaning there's not a good connection at the top of the filter to allow water to pass through and on to the other sumps. The workaround that's been mentioned is placing cut straws or cut and coiled spare Aquasana hose in the bottom of the pre-filter sump, placing the filter on top and then securing the lid. If you haven't already, you may want to call Aquasana customer support. They may provide replacement filters. For what it's worth, I've not personally encountered this issue and have had three AQ-5300 over 9 years. I've always purchased replacement filters directly through Aquasana. I wish you the best of luck in resolving this issue!
Wow, THANK YOU for all this info. I'm glad I read all these comments before replacing my filters, because this same issue happened to me: no water coming out. I added a piece of the old filter's plastic net that holds the fabric in place (trying to mimic the piece of straw that you mentioned) and it worked like a charm 😊😊😊 Thank you, thank you. You made this project so easy with your instructions!
@@lilianazmj You're most welcome! I'm glad that resolved the issue. Using the filter net in the bottom of the sump was a clever idea! Thank you for mentioning this ♥
Great video. You really explained it step by step and to the point. Thank you very much !
I'm so glad ☺ Thank you for your kind feedback!
This was a great video very helpful. Thank you very much.
My pleasure. I'm so glad you found this video helpful!
This is exactly what I needed from start to finish! Thank you.
I'm so glad you found this video helpful. ☺
How to replace similar supply valve but it’s soldered.
Great question! If the valve is soldered on, you will have to cut it off with a pipe cutter in order to put a new valve on. You can install the same or a different type of shut-off valve (solder-type, compression-type or push-to-connect). You may find this video by seejanedrill helpful, which shows how to cut a copper pipe to remove a soldered-on valve (and other great info): th-cam.com/video/HeEORnczD3s/w-d-xo.htmlsi=LUyd1ELO9uJr3jRS
The OP said you'll have to cut it off but you can also get a torch and heat the old solder and remove the valve that way
I can’t get the case to slide open and it’s driving me crazy. No screw either
Have you tried using something with a rubber/grippy surface to help slide the cover down like a rubber jar opener or work gloves with grippy material on the finger tips?
@@wildcat-diy yeah. I think the previous owners of the house sealed it with something
I'm having the same problem. The previous owner never had to change the battery. I can't find a manual online for instructions.
Gently pry up the sides with your fingernail or a thin blade, being very careful not to break the cover. The prying may loosen the cover so it can slide off normally.
This is the best video I have seen thus far. I didn’t know there was a special tool to remove the ferrel washer. Thank you for the tutorial!
Thank you for your kind words ❤ The compression sleeve puller tool is a life saver!
You moved very fast. I'm still confused as to which way to turn the various nuts to remove the old valve. Yours seem to turn the opposite way to mine.
Thank you for the feedback, I appreciate it! For the larger valve nut on the copper water line and with the valve handle facing you, I turned the nut from left to right (clockwise) to loosen it. For the smaller nut on the toilet water supply line, I turned it counter-clockwise to loosen it. I removed the nuts from the new valve to figure out which way to turn the old valve nuts to loosen and remove them. Hope this helps!
@@wildcat-diy I managed to get the old unit off. I bought the sleeve puller but the directions that came with it were pretty useless. I tried to follow what you did but I can't get any movement of the compression sleeve. The handle that you turn is hitting the arms of the tool where they stick out backwards and won't turn any further. Some information on how to set up the tool would be very helpful. Have spent several hours removing, adjusting and re-installing the tool in an attempt to get it to do anything.
@golden.lights.twinkle2329 Glad you got the old valve off! It took me numerous turns to remove the tight compression sleeve. I didn't find the tool's arms to be useful beyond initial placement and I've seen others tape them together to keep them out of the way while turning the handle. Superior Tool has a quick video on how to use this same tool that you may find helpful: th-cam.com/video/7KDe8ACKjwc/w-d-xo.htmlsi=daX6a9tS83btSykN
Toto are an outstanding brand. I’m getting my Kohler Wentworth toilet installed tomorrow. Reduced from 1100 bucks down to 290 bucks. Brand new one from the display room. Your video is well done and informative. Cheers NZ.
Thank you and Wow, very nice! Congrats on the new toilet!
Wow very nice 👍🏻👍🏻 thanks
You're most welcome!
Thank you!
You're most welcome!
Great comment / call out about not sealing the entire base!
Thank you!
THEY COME IN WHITE 😳
🎉 I had the same reaction when I learned this week that Hunter used to make cast iron ceiling fans (Hunter Originals) that require oil.
Thank you so much. This video was exactly what I needed. It was to the point and very informative.
I'm so happy to hear that! Thank you for the feedback!
very helpful
I'm so glad!
Battery? Why does a passive water filter have a battery? Some kind of reminder signal?
Yes, that's exactly right! The unit beeps to indicate a filter change is needed, which for this system, is either after 6 months of usage or once 600 gallons of water have been filtered.
What type of battery does it use ?@@wildcat-diy
@@t0107lbThis unit, the Claryum 3-Stage Filter system (AQ-5300), takes one CR2450 3V battery.
@@wildcat-diymine never beeped at all, and since we recently moved into this home I had no clue as to when to change filters. Yesterday the front cartridge began dripping water sometime during night. When we caught it this morning water had already seeped under my wood floor and carpeting. These water filters should never leak. Maybe stop working but not leak. What if homeowner is away for couple weeks? There goes flooring in whole house.
@@carolyncook3611 That's terrible!! I'm so sorry and I wish you the best ❤ If you connect with Aquasana, I hope their customer support can offer some assistance. Thank you for sharing your experience so others can be aware of potential issues like this. Could you tell where the leak was coming from on that first filter cartridge? From what I've seen, a leak can be caused by worn or damaged O-rings on the sump top, the sump body and top being either too loose or too tight, or the sump being cracked.
Great job on this video!
Thank you!!